Adjustable Button Necklace

This wonderful tutorial is made by Petronella Luiting specially for our project "Tarbetust tarvilikuks" (Trash to treasure) - in witch we share tutorials of recycling and reusing things. This project is in Estonian language but some of the texts will be available in English as well...
There are plenty of fab tutorials in Estonian version of the page - you can check them out HERE. Don't speak Estonian? No problem just crab Google Translate and follow clear and good photos of the instructions. Happy discovering!
Project is supported by EAA and Norwegian Financial Mechanisms through Fund for NGOs.

Click the link and...

Do you have old buttons in the house ? I am sure you do, and if not I am sure you know someone who does. Don't throw them away, because they can become a very lovely necklace. For this tutorial I gathered a lot of old bone, wood and coconut buttons. But you can use all other kind of buttons just as you want. So, here we go.
Material needed:
- Old buttons
- Some kind of cord; this must be thin enough to go through the button holes, but it must also be strong enough to hold the bunch of buttons you are going to use (I used here shoe-lace cord, but you can also use some thin rope, or some strong yarn, etc.)
- Needle (the eye of the needle must be large enough for the cord but also small enough to go through the button holes; just try it out)
- Scissors
- Measuring tape
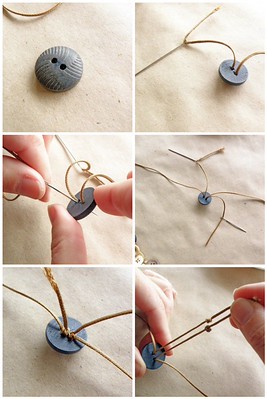
Step 1:
Measure about 150 cm of the cord and cut it off; thread this piece on the needle you are going to use. Then you take your first button and string it on the thread: from the wrong side of the button to the right side in one hole, and then back again through another hole from the right side to the wrong side of the button. Shove the button to a distance of about 40 cm from the other end of the cord.

Step 2:
Take another button and string that on the cord in the same way as the first button; thus, from the wrong side of the button to the right side in one hole, and then back again through another hole from the right side to the wrong side of the button. Shove the button on to the first button; the two buttons will now face each other with their wrong sides, and both right sides are showing.
Step 3:
Repeat step 2 as long as you like the necklace to be (I made it here about 50 cm long).

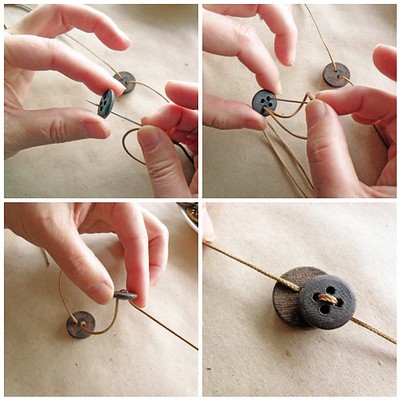
Step 4: the adjustable closure.
Take a button with 2 really big holes (the cord has to go
twice through each hole). String it on again, but do not shove it to the
others; leave it at about 10 cm from the end of the cord.
Thread a needle on
the other end of the cord (remember we shove the first button up to about 40cm
of that end). Now you string this big button again but in exactly the opposite
direction; where the first cord end comes out of the button, you go in now with
this second end, and you come out with this second end where the first cord end
is going into the button.
Now you knot each end, so that they cannot slide out of the button. By pulling both ends you can make the necklace as long as you want (both ends of the cord slide through that one button in opposite directions).
And the necklace is ready!
As I said before, you can do this with all the buttons you can find and all possible cords (you can even use elastic cord to make a bracelet); so, at the end of this tutorial some more examples with different buttons and cord.


Comments: 20
this is great! i'm going to try it out. how about the bags? when are the deadlines for that?Add a comment